I think there's an issue with my storage device, but I'm not sure Start a free evaluation →
I need help getting my data back right now Call now (800) 972-3282
Every time you need to install a new application, a game, or software, for example, you need to make sure your computer has the required specifications so the new app can work properly. But, how can you find which hard drive type your PC uses?
All you need is to use the right command that will give any information about your HDD or SSD.
SalvageData experts made this quick guide to help you learn what kind of hard drive you have and all the details about it.
Top summary: Learning if your computer uses HDD or SSD is quick and easy. Learning its detailed information is slightly more complicated, but you still can do it in just a few minutes.
Checking if the hard drive type is SSD or HDD
You can use a few commands on Windows to learn more about what kind of hard drive your computer has. Check the following topic to learn more about your hard drive on Mac.
Use PowerShell
The PowerShell, or command line, is the easiest way you can find if your computer uses an SSD or HDD as a hard drive type.
Step 1. Press the Windows key and R to open the Run window
Step 2. Write PowerShell and open it
Step 3. Use the “Get-PhysicalDisk | Format-Table -AutoSize” command and press enter. It will show your hard drive under Media Type.
Disk Defragmentation Tool
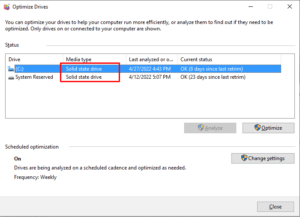
To find what kind of hard drive you have with the disk defragmentation tool (drive optimizer in Windows 8, and disk defragmentation tool in previous versions of Windows) open the Run window and use the “dfrgui” command.

IBM-Compatible Machines
For additional info about external hard drives, IBM-compatible users can turn to their computer’s BIOS setup. Typically, CMOS will list information such as the hard drive’s serial number, model number, cylinders, heads, sectors, and size.
To enter the BIOS or CMOS setup, you’ll need to press one of these function keys at the top of the keyboard as your machine is booting up:
- F1
- F2 or F10 *
- Del
- Esc
* F10 is often used to access the boot menu. If pressing F10 brings up the boot menu, your setup key is likely F2. And the other way around: if F2 opens the diagnostic tool, your setup key is most probably F10.
While this method can provide you with the most comprehensive answer to the question “What hard drive do I have”, the hard drive values may not be correct if your computer’s CMOS is not configured to detect it automatically.
Getting Model Info Directly From a Hard Drive
You can get detailed information about your hard drive directly from it. Remove it from the system and check its data.
Important: Because of its fragile design, this type of storage media is highly susceptible to physical damage, and therefore requires special care in handling. If you are unfamiliar or uncomfortable with the process, we recommend resorting to less risky methods.
Summary: Use built-in tools to learn more about your drive type. It can be the defragmentation tool or the PowerShell tool. You can also always open your device and check the details on the drive itself. Or, you can use your device’s serial number to look for its data on the manufacturer’s website.
How to check a PC’s hard drive detailed information
Now that you know if you’re using a PC or laptop with SSD or HDD, it’s time to learn more about it, such as its storage size and model.
Windows’ System Information Tool
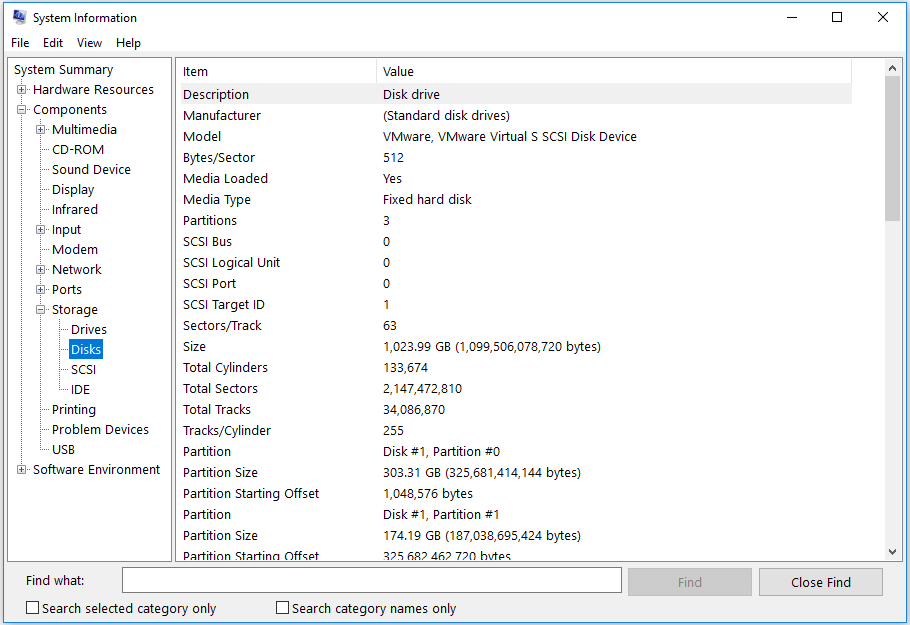
The built-in System Information utility allows Windows users to view detailed information about their computer hardware. You can check your PC’s disks, model characteristics, hard drive manufacturer, partitions, and more.
Open the tool by typing “System Information” in the search box or by using the Run window and using the “msinfo32” command.
On the left side of the System Information window that opens, you can see a list of hardware categories. Expand Components > Storage > Drives or Disks from the menu tree to check the hard drive type and specifications, or choose any other category you’d like to view.
System Information Tool In Earlier Windows Versions
The System Information tool is also available in earlier Windows versions, such as Windows 7/8, Windows Vista, and Windows XP. To open the utility, follow these steps:
Step 1. Click Start and open the Programs folder.
Step 2. Select Accessories, then click the System Information or System Tools.
Step 3. Open the System Information file.
Step 4. Expand Components > Storage > Drives.
On the right side of the window that opens, you’ll see information about the drive, including its serial number and capacity.
Drive Information In MacOS
Although the process is slightly different on macOS computers, finding detailed information about attached drives, including type, location, and capacity, is also easy. Here’s what to do:
Step 1. On the top left side of the screen, click on the Apple icon, then choose About This Mac.
Step 2. Select More Info. Navigate to the hardware section.
Step 3. Click Serial-ATA for hard drive information, or USB to check the size and model/serial number of your USB external drive.
Summary: You can see your hard drive’s detailed information on Windows or macOS in just a few seconds. These are important details to know if you need to install a new application or software that has minimum requirements, so you can make sure your device supports it.
As always, if you need any help with your hard drive you can contact us. Our experts are ready to assist you at any moment.


